
Avoiding Bot Detection and Bypassing Captchas: Playwright & Python
 Ouhadj ilyes
Software Engineer
Automation
Category
Feb. 17, 2023
Updated on
In today’s
article I’ll cover how to avoid bot detection through fingerprint spoofing and proxies as well as how to bypass
all kinds of captchas using live human solvers (third-party service) with Playwright (Python).
This is not just a simple User Agent spoofer,
these techniques will allow you to defeat JavaScript fingerprinting
technologies, including HTTP client-hints, Navigator, Screen, Time zone , Geolocation API and a lot more. they
also protect against WebRTC leaks, modify WebGL fingerprints and even CSS-based font detection. They have helped
me to scrape amazon in large scale and automate posting videos to Tiktok for instance.
Disclaimer
Zedkira takes no responsibility if these techniques are used for any malicious purposes it's only meant to make legal web scraping easier and scalable, It may also help businesses protect their websites from malicious bots.
You can find the complete code on Github.
Let’s dive right in !
Project Setup
I will assume you have the latest python version installed with Pip (download and install it from here if you don't).
Install playwright using pip:
pip install playwright
Install the required browsers:
playwright install
Now create a python script, we'll first import playwright and initialize a firefox browser instance, we then need to create new page or tab and visit google.com and finally close the browser !
from playwright.sync_api import sync_playwright

with sync_playwright() as p:

    # launch an instance of a firefox browser
    browser = p.firefox.launch()

    # create a new tab or page
    page = browser.new_page()

    # visit the website given
    page.goto("https://www.google.com/")

    # make sure to close the browser at the end
    browser.close()
That's it ! we have now finished setting up our bot for automating a browser but the problem is that it's easily detected and blocked from websites that have high security. so let's do some magic and hide our bot !
The first question that comes to mind is how websites detect that you are automating a browser ? and the answer is Browser Fingerprinting. In simple words, browser fingerprinting is an incredibly accurate method of identifying unique browsers and tracking online activity. The fingerprints of the browsers provided by automation frameworks (playwright, selenium...etc) are not as generic as the real browsers used by real users. So our goal is to change those fingerprints to real ones that are used by real browsers.
Here's a list of some fingerprints that need to be spoofed in order to make the browser look real:
- Browser type and version
- Operating system
- Active plugins
- Time zone
- Language
- Screen resolution
- HTTP Client-Hints
- Navigator
- Geolocation
- WebRTC
- WebGL
- CSS-based fonts
- HTML5 canvas
- ...
In Addition to fingerprint spoofing, websites will be suspicious if all of your autoamtions are coming from one IP address, and here comes the need for proxies. a proxy server acts as an intermediary between your automation requests and the website you're trying to automate, so they can't see your real IP address hence you can use a different IP in each autoamtion instance.
Enough theory, let's get right into the practial part and start with fingerprint spoofing.
1- Avoid Bot Detection
Fingerprint Spoofing
There are basically 3 methods to spoof the browser fingerprint:
Do It Yourself:
As the name suggests, you can just go ahead and learn more about web browsers , browser fingerprinting
and read Playwright Docs to learn how to make the propper changes to the different browsers they provide.
You can also check the source code of the package I mention in the second method below to speed up the process !
Playwright Stealth:
an open source package for Playwright (Python) on Github that does spoof many things and does a good job hiding the bot but still not good enough
for websites that have high security and advanced bot detection techniques. Here's how to use this package:
Make sure you have Python and Playwright installed. Install playwright-stealth using pip:
pip install playwright-stealth
All you have to do is just give the browser a page to the package using the stealth_sync() or stealth_async() functions and they will take care of making the proper changes.
Sync:
from playwright import sync_playwright
from playwright_stealth import stealth_sync

with sync_playwright() as p:
    for browser_type in [p.chromium, p.firefox, p.webkit]:
        browser = browser_type.launch()
        page = browser.new_page()
        stealth_sync(page)
        page.goto('http://whatsmyuseragent.org/')
        page.screenshot(path=f'example-{browser_type.name}.png')
        browser.close()
Async:
# -*- coding: utf-8 -*-
import asyncio
from playwright import async_playwright
from playwright_stealth import stealth_async

async def main():
    async with async_playwright() as p:
        for browser_type in [p.chromium, p.firefox, p.webkit]:
            browser = await browser_type.launch()
            page = await browser.new_page()
            await stealth_async(page)
            await page.goto('http://whatsmyuseragent.org/')
            await page.screenshot(path=f'example-{browser_type.name}.png')
            await browser.close()

asyncio.get_event_loop().run_until_complete(main())
Kameleo: For developing a powerful automation and automate a website with advanced bot detection techniques, Kemeleo is definitely the way to go, it completely eliminates bot detection, it does a great job spoofing the browser fingerprint and makes automation easier.
Let's now see an example of how Kameleo can be integrated in Playwright. For more on how kameleo works and how to get started, take a look at their Article. First, download the Kameleo Installer from here and install it on your computer. Once the installation is complete open the command prompt!
- First, navigate to the Kameleo application folder (by default: C:\Users\
\AppData\Programs\Kameleo):
$ cd C:\Users\<YOUR_USERNAME>\AppData\Programs\Kameleoand start Kameleo with the following command:
$ Kameleo.CLI.exe email=<YOUR_EMAIL> password=<YOUR_PASSWORD> - Install their Python Client:
pip install kameleo.local-api-client - We've now finished installing and starting Kameleo (Do not close the command prompt!), let's get to the coding part!
First, import the required dependencies and connect to the Kameleo.CLI component.
By default, it is listening on 5050, but can be overridden in the appsettings.json file.
from kameleo.local_api_client.kameleo_local_api_client import KameleoLocalApiClient from kameleo.local_api_client.builder_for_create_profile import BuilderForCreateProfile from kameleo.local_api_client.models.webgl_spoofing_options_py3 import WebglSpoofingOptions kameleo_port = 5050 client = KameleoLocalApiClient(f'http://localhost:{kameleo_port}') - Filter and search base profiles:
base_profiles = client.search_base_profiles(
    device_type='desktop',
    browser_product='chrome',
    language='en-en'
)
- Choose one of the Base Profiles. Create a new profile with recommended settings and setup the exact configuration:
create_profile_request = BuilderForCreateProfile \ .for_base_profile(base_profiles[0].id) \ .set_recommended_defaults() \ .set_webgl( "noise", WebglSpoofingOptions( vendor='Google Inc.', renderer='ANGLE (Intel(R) HD Graphics 630 Direct3D11 vs_5_0 ps_5_0)')) \ .set_start_page("https://kameleo.io") \ .set_password_manager("enabled") \ .build() profile = client.create_profile(body=create_profile_request) - Launch the browser for the profile:
client.start_profile(profile.id)
Here's the full code example:
from kameleo.local_api_client.kameleo_local_api_client import KameleoLocalApiClient
from kameleo.local_api_client.builder_for_create_profile import BuilderForCreateProfile
from kameleo.local_api_client.models.problem_response_py3 import ProblemResponseException
from playwright.sync_api import sync_playwright
import json


try:
    # This is the port Kameleo.CLI is listening on. Default value is 5050, but can be overridden in appsettings.json file
    kameleo_port = 5050

    client = KameleoLocalApiClient(f'http://localhost:{kameleo_port}')

    # Search Chrome Base Profiles
    base_profiles = client.search_base_profiles(
        device_type='desktop',
        browser_product='chrome'
    )

    # Create a new profile with recommended settings
    # Choose one of the Base Profiles
    create_profile_request = BuilderForCreateProfile \
        .for_base_profile(base_profiles[0].id) \
        .set_recommended_defaults() \
        .build()
    profile = client.create_profile(body=create_profile_request)

    # Start the browser profile
    client.start_profile(profile.id)

    # Connect to the browser with Playwright through CDP
    browser_ws_endpoint = f'ws://localhost:{kameleo_port}/playwright/{profile.id}'
    with sync_playwright() as playwright:
        browser = playwright.chromium.connect_over_cdp(endpoint_url=browser_ws_endpoint)
        context = browser.contexts[0]
        page = context.new_page()

        # Use any Playwright command to drive the browser
        page.goto('https://google.com')

    # Stop the browser by stopping the Kameleo profile
    client.stop_profile(profile.id)
except ProblemResponseException as e:
    raise Exception([str(e), json.dumps(e.error.error)])
Proxies
Without any doubt, proxies are an essential part of any web automation. While you can carry out automation without using proxies, it is highly unlikely that you will do automation in a medium to large scale without making use of proxies.
Automation bots tend to be super fast and can execute many automations at once in case you consider using multiprocessing, so when websites detect many activites or requests are coming from the same IP address (user), they will block your bot, this is called Rate Limiting and in simple words, it's just a method that blocks users, bots, or applications that are over-using or abusing a web property.
Using Proxies With Playwright:
Let's first see an example of how to use proxies in playwright then we'll take a look at another example of how to use proxies with Kameleo as well. When using proxies, you have to choose a proxy provider , while there's many to choose from, from my personal experience in the web automation I will recommended using Bright Data, it's one of the largest proxy providers in the industry and providers really good proxy quality but there's still other good options that you can choose from and also the integration is fairly simple and almost the same for all providers.
Here's the general integration of an HTTP proxy in Playwright (get the server URL, Username and Password from the proxy provider's dashboard):
browser = chromium.launch(proxy={
    "server": "http://myproxy.com:3128",
    "username": "<USERNAME>",
    "password": "<PASSWORD>"
})
This is an example of Bright Data Integration:
browser = chromium.launch(proxy={
    "server": "http://zproxy.lum-superproxy.io:22225",
    "username": "lum-customer-USERNAME-zone-YOURZONE",
    "password": "PASSWORD"
})
Using Proxies With Kameleo:
If you have followed along the article and considering to use Kameleo, in this section we'll take a look at how to integrate proxies with Kameleo, the integration is slightly different, we need to configure the Kameleo profile to use our proxy instead. You can find the complete code example here.
# Choose one of the Base Profiles and set the proxy server configs
create_profile_request = BuilderForCreateProfile \
    .for_base_profile(base_profiles[0].id) \
    .set_recommended_defaults() \
    .set_proxy('HTTP', Server(host='<PROXY-PROVIDER-URL-HERE', port=22225, id="USERNAME", secret="PASSWORD")) \
    .build()
profile = client.create_profile(body=create_profile_request)
Using Bright Data With Kameleo:
Get the server url, username and passwrod from Bright Data dashboard and configure the kameleo profile to use it.
# Choose one of the Base Profiles and set the proxy server configs
create_profile_request = BuilderForCreateProfile \
    .for_base_profile(base_profiles[0].id) \
    .set_recommended_defaults() \
    .set_proxy('HTTP', Server(host='zproxy.lum-superproxy.io', port=22225, id="USERNAME", secret="PASSWORD")) \
    .build()
profile = client.create_profile(body=create_profile_request)
Using a combination of Kameleo and Bright Data residential proxies, you can develop really dangerous bots, make sure to use them for building useful and helpful automations that make people's lives easier instead.
2- Bypass Captcha
Nowadays, captchas are no more a problem in web scraping or web automation, let's see how do they work and what triggers them at the first place, and of course how to avoid them or solve them if needed.
How it works ?
The exact configuration of a CAPTCHA depends on the webmaster: it can protect the whole website or specific pages. There's mainly 2 types of captchas:
Unusual Traffic Captchas:
As the name suggests, these captchas appear when the website detects unusual traffic or some kind of automation and they need some kind of trigger to appear.
The main factors that cause this type of captchas to appear are as follow:
- Simple CAPTCHA triggers: These include unusual traffic, high number of connections from a single IP address, or the use of low quality datacenter IPs. For example, VPN users see more CAPTCHAs than regular website visitors because VPNs get their IPs from a data center. The same is with corporate networks that share an IP address between many employees.
- Passive fingerprinting: A collection of parameters that evaluate your network and device. The most important are HTTP headers, user agent, TLS and TCP/IP data.
- Active fingerprinting: An even more elaborate technique that sniffs out advanced information about your hardware and software through JavaScript. It looks into WebGL parameters, fonts, plugins, and more.
You don't need to worry about this type of captcha or those factors if you're using Kameleo and residential proxies with a proxy provider like Bright Data. Also make sure to mimic human behavior as much as possible in your automations, those are the optimal ways to avoid them.
Fixed Captchas:
Sometimes, a page will always throw up a CAPTCHA, especially if it's a registration, comment form, or checkout page. In this case, The simplest (and relatively low-tech) method would be to get a CAPTCHA solving service. When we encounter a captcha in our automation, all we have to do is to get the hash of that captcha from the page HTML content, send it to the captcha solving service which uses real humans to solve the challenges, finally we'll need to update our browser with the solution we get from that captcha service.
Dealing with CAPTCHAs this way costs 1-3 dollars per 1,000 challenges. The leading captcha solving team or service is 2Captcha. Solving captchas with this method is fairly simple, in the next section I'll show you an example of integrating 2Captcha with Playwright.
2Captcha
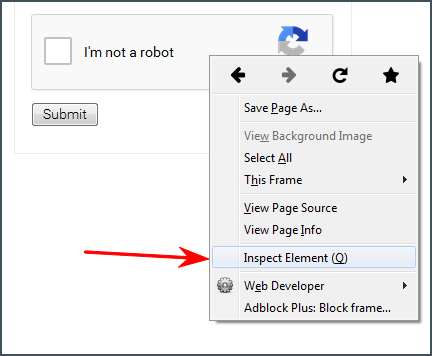
The process of solving captchas with 2captcha is fairly easy and it's mostly the same for all types of captchas, we will take a look at how to solve the most popular type of captcha using playwright, which is reCAPTCHA V2 and it looks like this:

- First, sign up here and get your API key from the website dashboard and store it somewhere secure.
-
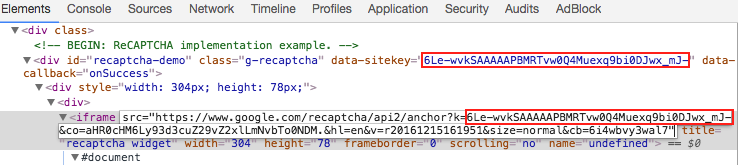
Look at the element's code at the page where you found reCAPTCHA.
- Find a link that begins with www.google.com/recaptcha/api2/anchor or find data-sitekey parameter.
-
Copy the value of k parameter of the link (or value of data-sitekey parameter).
-
Now, we need to submit a request to their API with 'method' set to 'userrecaptcha'
and provide the value found on previous step as value for 'googlekey' and full page URL as value for 'pageurl'
and get the solution. Here's a simple funciton in python that will do that:
import requests import time def bypass_captcha(): API_KEY = '<YOUR-API-KEY-HERE>' data_sitekey = '<CAPTCHA-DATA-SITEKEY-HERE' page_url ='<the website url where your captcha appears>' request_url = f"https://2captcha.com/in.php?key={API_KEY}&method=userrecaptcha&googlekey={data_sitekey}&pageurl={page_url}&json=1&invisible=1" response = requests.get(request_url).json() print(response) rid = response.get("request") token_url = f"https://2captcha.com/res.php?key={API_KEY}&action=get&id={int(rid)}&json=1" form_token = "" while True: token_response = requests.get(token_url).json() print(token_response) if token_response.get("status") == 1: # get the solution : a token that we need to update our browser with. form_token = token_response.get("request") break time.sleep(1) return form_token -
When you encounter the captcha, call the above function and it will return the token received from 2Captcha.
Locate the element with id g-recaptcha-response and fill it with that token.

Here's a code example in playwright:
# call the funciton for the current page and get the response token
token = bypass_captcha()

# Update the page with the solution
token_js = f'document.getElementById("g-recaptcha-response").innerHTML="{form_token}";'

page.evaluate(token_js)

# submit the form if it is a form
# ...
#
Conclusion
I hope this article was helpful, if you need more help or got any questions, feel free to reach out to us using the Contact Form or by Email and we would be happy to help !